My support for the Razer Blade 2017 has really gone out the window now. After multiple RMAs, ghosting issues, and the likes, I’ve really had enough with this machine. However, recently, I noticed a massive battery bulge through my trackpad, and have noticed a similar behavior starting to arise in my brother’s as well (he also uses the same model).
Since mine seemed quite dangerous, I got it replaced immediately and have since looked at ways to prevent this from happening again, for at least the next 2~3 years.
The solution that I hope will prevent this issue from occurring again is undervolting your laptop. I read from various posts on Razer’s subreddit that users have tried this to keep the laptop’s temperature at a reasonable level, as high temperatures can cause your battery from swelling.
Pre-Caution
Note that this post shows my implementation, and you may need to do custom tweaking with your laptop to achieve stability.
Overview of Steps
Before we go into the nitty-gritty details, to give a high-level overview of what we will be doing so you know what you are getting into:
- Download ThrottleStop
- Adjust settings to take advantage of Kaby Lake
- Undervolt your CPU
- Check that it has been applied
- Stress test for stability
- Auto-startup ThrottleStop
Undervolting Step-by-Step
Again, these steps worked for my setup. If you have the same model as me, it will likely work with yours with vary little tweaking necessary.
Download and Install Tool (ThrottleStop)
There are two softwares that people primarily use: ThrottleStop and Intel XTU. I am using ThrottleStop because that’s what the majority of the Razer Blade users seemed to use based off of what I have read on reddit and Razer’s forums. You can download the latest version from this NotebookReview thread. As of this post, the latest version is 8.70.6.
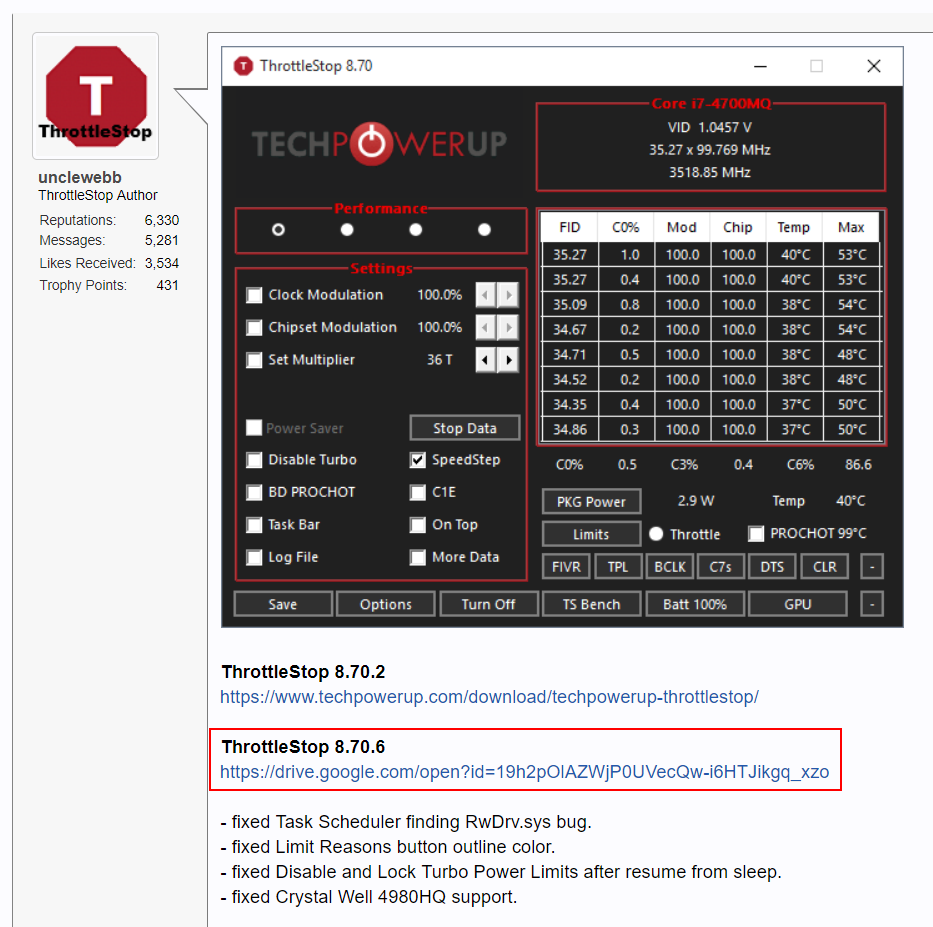
The installation is simple. Extract it and that’s it. I suggest extracting to your “C:\Program Files” since this tool will be a “permanent” tool for your system.
ThrottleStop Settings Setup
When you launch “ThrottleStop.exe” from the extracted contents, at first, you will get a warning about how the software could damage your system. Again, this is true, so double, triple check before you confirm anything.
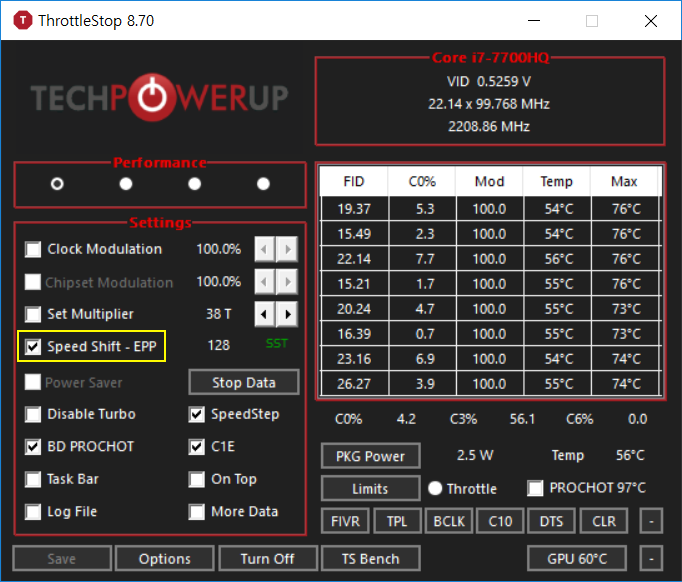
Once the program is open, from the defaults, I checked:
- SpeedShift – EPP : To take advantage of Kaby Lake (If you are on Skylake, you should check this too)
Next, I clicked “Options” to additionally check:
- CPU Temp : To show the CPU temperature in my notification area
- Start Minimized : This starts ThrottleStop in a minimized state
- Minimize on Close : To prevent accidentally closing ThrottleStop
- Nvidia GPU : To also show my GPU’s temperature on the main ThrottleStop window
With the above checked, your “Options” should look like the following:
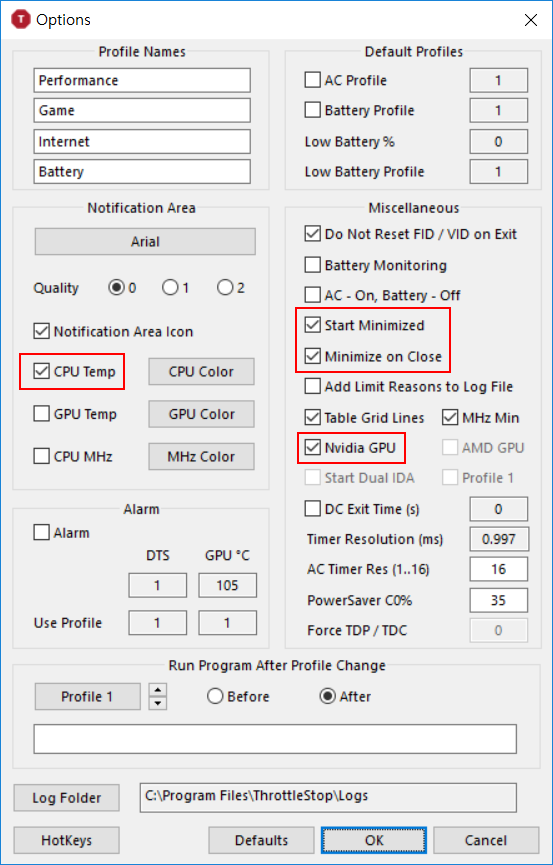
Click “Ok” to save your options.
Note that you can also setup Profiles for different tasks. I will explain setting up different profiles for different situations in a next post to keep this one short.
TPL (Turbo Power Limits) Setup
Since we have checked “Speed Shift – EPP” in “Settings,” we also have to enable “Speed Shift” when ThrottleStop launches. Click “TPL” to open your “Turbo Power Limits” window.

In this window, make sure to check that both “Speed Shift” and “Enable Speed Shift when ThrottleStop starts.” After that, click “Ok.”

FIVR Setup
Now we will undervolt the CPU. Again, this is the riskiest operation, but if you follow my steps, there really should not be any risk!
Click “FIVR” (which is to the left of “TPL”) in the main ThrottleStop window.
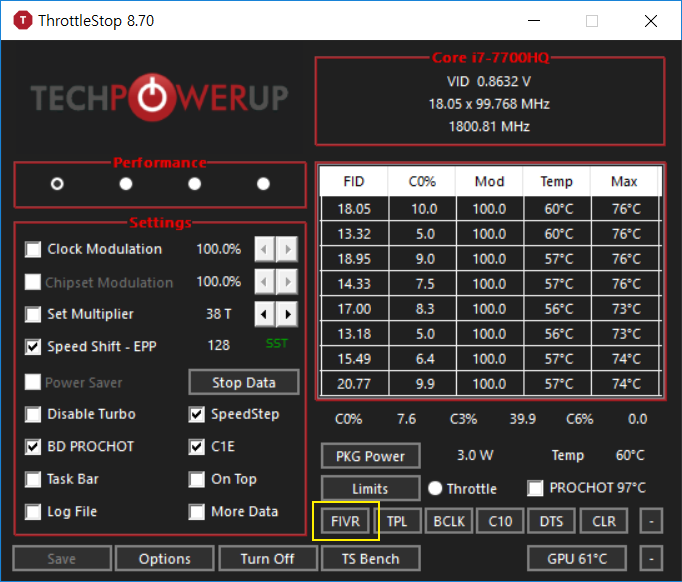
At the center, top area, you will see “FIVR Control,” with 5 radio buttons. From here, we will undervolt “CPU Core,” “CPU Cache,” and “Intel GPU.”
First, select “CPU Core.” Next, right underneath, check “Unlock Adjustable Voltage” inside “CPU Core Voltage.” Make sure the radio button “Adaptive” is selected. Now, modify the “Offset Voltage” to -110 mV. This value seems to be one that works for most Razer Blades. I’m being conservative tho, as I have mine set at -120 mV and have not encountered instability.

Next, select “CPU Cache” and do the same as above. Check “Unlock Adjustable Voltage” and put it to the same “Offset Voltage” as your “CPU Core.”
Finally, select “Intel GPU.” We will undervolt this less than the previous two because many users have reported that undervolting it too much easily makes the system go unstable. Check “Unlock Adjustable Voltage,” and set the “Offset Voltage” to -50 mV.
Now that is done, first double check to make sure you have made the correct changes. A mistake could melt your laptop.
Once it has been checked, click “Apply” to see the changes take effect at the top right section of the FIVR window.
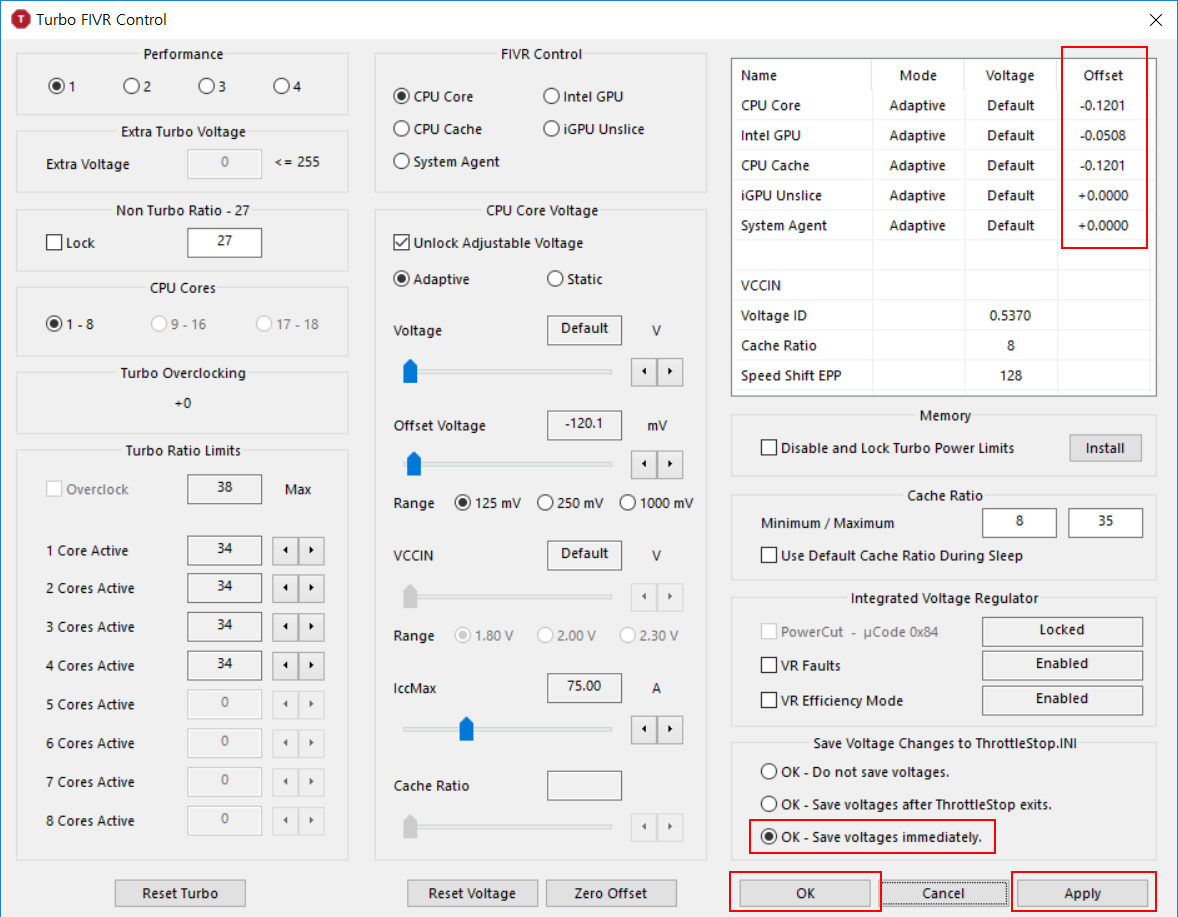
Finally, select the radio button “OK – Save voltages immediately.” to prevent losing your voltage values in the case of a crash, and click “OK” to finish the FIVR setup and go back to ThrottleStop’s main window.
Turn On
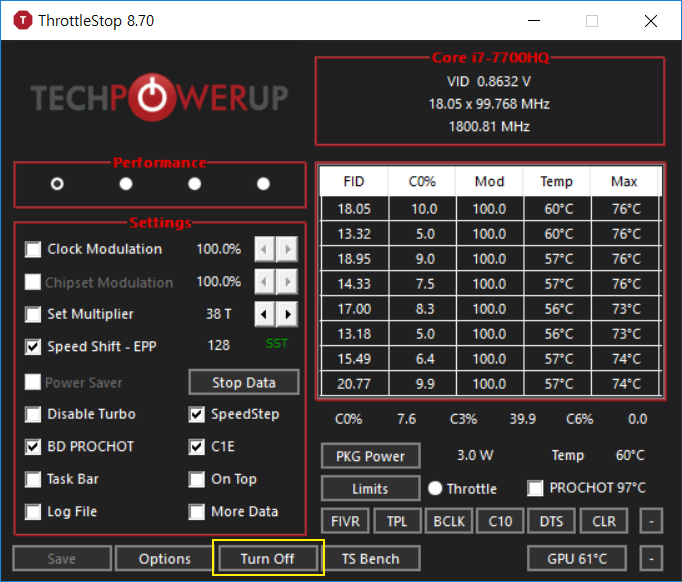
With all the changes made, at the bottom of the main window, click “Turn On” to get ThrottleStop to go into effect. (If “Turn Off” is shown, it means that ThrottleStop is already running.)
Check for Changes
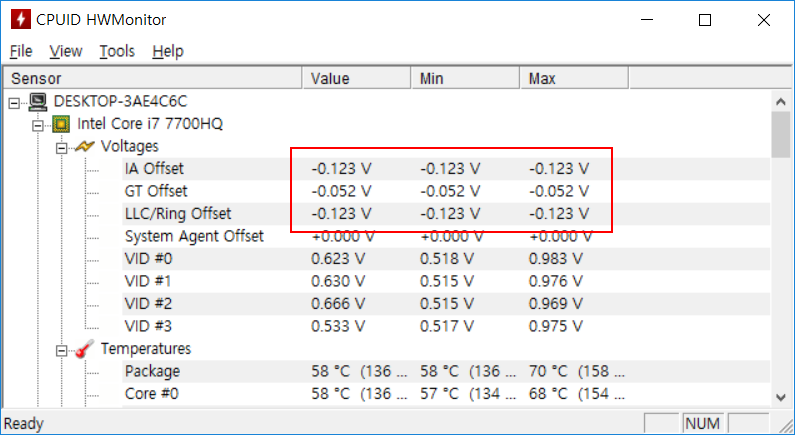
To ensure that undervolting is in effect, we can use a separate software to check it. I downloaded HWMonitor’s portable version (the ZIP version), extracted it, and ran “HWMonitor_x64.exe” to verify the undervolt. As you can see below, it is working!
Stress Test
Now, this is probably the second most important part of this whole experience, as stress testing will tell you if you need to be more conservative or can be more aggressive with your settings.
For CPU intesive tasks, Prime95 is an easy option. To test your GPU, Fire Strike works. In my case, I only tested using Prime95.
Download Prime95 v26.6 and extract it at your preferred destination and run “prime95.exe.”
Running a torture test with the radio button selected at “Blend” with the default settings (in my case 8 torture threads) should be fine.
You should audibly notice your system getting to work. You want to run it for as long as you feel that the system has been sufficiently tested under load. This is where poor ThrottleStop settings can make your system freeze up or display a BSOD before crashing.
If such an event occurs, you need to go back to ThrottleStop and adjust the “Offset Voltage.” A good convention is to adjust by 5 mV. (For example, -120 mv to -115 mV)
Make sure that it is running for at least 5 minutes for the temperature to settle down. I usually leave it running for about 20~30 minutes, but I know that overclockers can have it running for hours.
For fun, after you are done testing, open up ThrottleStop from your notification area, and check your “Max” in the table with the headings, “FID, C0%, Mod, Temp, Max.” Likely, this will be in the 90’s. 97 °C is the throttling point for the i7-7700HQ, and you may have triggered it. However, Prime95 is very intense and during your daily tasks, you should rarely encounter this.
For my setup, I tested by playing “Overwatch” and noticed my temperature hovering around 70 °C all game, from the previous 85 °C. I personally prefer not to go to the 80’s if possible, so these values were quite satisfactory for me.
Auto-Start ThrottleStop
Because ThrottleStop (and Intel XTU) is a software modification (there is a custom BIOS that unlocks overclocking capabilities), it does not run after a complete shutdown. We don’t want to remember to have to run it every time, so we can add it to Windows’ task manager.
This post from the official thread covers this with detailed screenshots. This step isn’t model specific at all, so referring to it works.
Concluding
ThrottleStop has a lot more features and what I’ve shown you in this post is just the bare minimum to extend your Razer Blade’s lifetime. Personally, running intense software that keeps the laptop very warm have caused my battery to swell (according to Razer) and this is my first measure to prevent that from happening again. I don’t want this post to end as a Razer compalint, but their Customer Support isn’t very supportive either, so you have to take your measures to keep your investment working from other potential defects down the road due to heat.
In a next post, I’ll also write about setting up custom profiles to switch between AC and battery mode to extend your battery life, and also measures to force your system to cool off if it nears its thermal safety margins.
If you have any questions, concerns, or comments, let me know in the comments section below and I’ll try to get back to you soon.