Fixing Bluetooth Connection Issue on Boot Camp Windows

Recently I had to re-format my dad’s Macbook Pro 2017 13-inch model with Windows 10 and faced an issue I never faced before when installing via Boot Camp. Note that I did completely get rid of the macOS partition this time around, but did download the latest Boot Camp drivers prior to removing macOS completely.

The issue was that when connecting a Bluetooth mouse to the newly formatted Windows, the mouse would respond when I had the Bluetooth settings page open, but would become unresponsive when I closed it. When I opened the settings page again, it would show that the mouse was connected and start moving again. Weird.

After a few hours of digging around on numerous Apple support forums, reddit, and other various Korean blogs/cafes, I found suggestions of updating the Broadcom drivers.

To jump to the conclusion, this fixed it. If you face similar symptoms, read on to see if you have the same driver numbers, and try manually updating the Bluetooth drivers, despite what the auto update might suggest (it will say that you have the latest drivers).

  1. Go to your “Device Manager” and under “System devices”, you should see Broadcom Serial Bus Driver over UART Bus Eunmerator. Check its driver version. Mine said 12.0.1.873.
  2. If you try to auto-update to the latest, it will just say that you have the latest drivers.
  3. I downloaded a more recent version of the drivers from here. The version I downloaded at the time of this post is 12.0.1.875.
  4. After downloading and extracting the ZIP file, try to update your driver again except manually this time and specifying the folder you just extracted.
  5. It should install the latest version, and you should see the new driver version (in my case, 12.0.1.875).
  6. Completely shutdown your computer (not restart). Boot your computer again and your Bluetooth connection issues should be fixed.

Let me know if it doesn’t work as intended, or the drivers aren’t available anymore as I do have a backup of it.

Preliminary ISM330DHCX Tests

Inertial measurement units (IMUs) are pretty important for legged robots, as it provides a sense of orientation. However, to get quality readings, these sensors do not come cheap. I’ve used LORD MicroStrain and VECTORNAV products in some of our bigger robots, but these are not exactly economical choices when you want a robot that is supposed to be on the more affordable side. Then there’s the interesting product out of nowhere from none other than ST: ISM330DHCX.

So I had to grab one and see how it performs. To keep things simple on my end, I got Adafruit’s version, but I don’t imagine the actual sensor behaving differently because it is from them. I hooked it up to a Raspberry Pi via I2C and here are the results.

With Covid, it is difficult at the moment to get my hands on the MicroStrain and VECTORNAV that we have in the lab, but I’ll update this post later on with those two and see how this guy performs against them.

Preparing Ubuntu 18.04 for Real-time and ROS 2

I’ve been setting up ROS 2 for one of my recent robotics projects that I am expecting will have important deterministic requirements. Surprisingly, while Dashing Diademata is the first LTS version with Ubuntu 18.04 as Tier 1, there isn’t much documentation on getting your operating system ready for real-time stuff, so I thought I might as well document my process. So as of writing this post, I am working with Ubuntu 18.04.2 which comes with the kernel version 4.18.0-15-generic.

Download Compatible Kernel and Patch

The idea is to modify your Linux kernel with a version where PREEMPT_RT is supported. According to the Linux Foundation Page, as of this post, the stable version is 4.19-rt. So, we want to obtain this stable version, as well as the corresponding Linux kernel.

To keep things a bit more manageable, let’s first create a kernel folder in your home folder and download, extract, and patch everything in there. First, let’s download the latest patch.

Edit: As of August 4, 2019, the above link no longer works as a new version has come out. To exactly replicate this post, run instead the following:

Then, from the Linux kernel page, also download the corresponding kernel version.

Because recent Debian versions surprisingly do not include bison or flex in build-essential, you need to install those two to copy your old config file over.

Once all the files have been downloaded and packages have been installed, let’s unpack the kernel and rename it so that it matches the patch name.

Patch Kernel

Now, inside the kernel folder linux-4.19.50-rt22, patch the kernel.

Next, we copy over the current OS configuration files, install some tools, and proceed with enable the preemptible kernel.

Now comes the step that has been slightly modified from previous versions because of the relocation of the option to select the Fully Preemptible Kernel (RT). Under General setup exists Preemptible Model. Select the Fully Preemptible Kernel (RT). (Note that this is NOT under Processor type and features)

Make and Install RT Kernel

Exit out of menuconfig and let’s make and install the kernel. Note that this process can take a while depending on the computer you are working on.

Once everything is done, reboot your computer. Your new kernel should show as 4.19.50-rt22.

Undervolting Razer Blade 2017 on Windows 10

My support for the Razer Blade 2017 has really gone out the window now. After multiple RMAs, ghosting issues, and the likes, I’ve really had enough with this machine. However, recently, I noticed a massive battery bulge through my trackpad, and have noticed a similar behavior starting to arise in my brother’s as well (he also uses the same model).

Since mine seemed quite dangerous, I got it replaced immediately and have since looked at ways to prevent this from happening again, for at least the next 2~3 years.

The solution that I hope will prevent this issue from occurring again is undervolting your laptop. I read from various posts on Razer’s subreddit that users have tried this to keep the laptop’s temperature at a reasonable level, as high temperatures can cause your battery from swelling.

Pre-Caution

Note that this post shows my implementation, and you may need to do custom tweaking with your laptop to achieve stability.

Overview of Steps

Before we go into the nitty-gritty details, to give a high-level overview of what we will be doing so you know what you are getting into:

  1. Download ThrottleStop
  2. Adjust settings to take advantage of Kaby Lake
  3. Undervolt your CPU
  4. Check that it has been applied
  5. Stress test for stability
  6. Auto-startup ThrottleStop

Undervolting Step-by-Step

Again, these steps worked for my setup. If you have the same model as me, it will likely work with yours with vary little tweaking necessary.

Download and Install Tool (ThrottleStop)

There are two softwares that people primarily use: ThrottleStop and Intel XTU. I am using ThrottleStop because that’s what the majority of the Razer Blade users seemed to use based off of what I have read on reddit and Razer’s forums. You can download the latest version from this NotebookReview thread. As of this post, the latest version is 8.70.6.
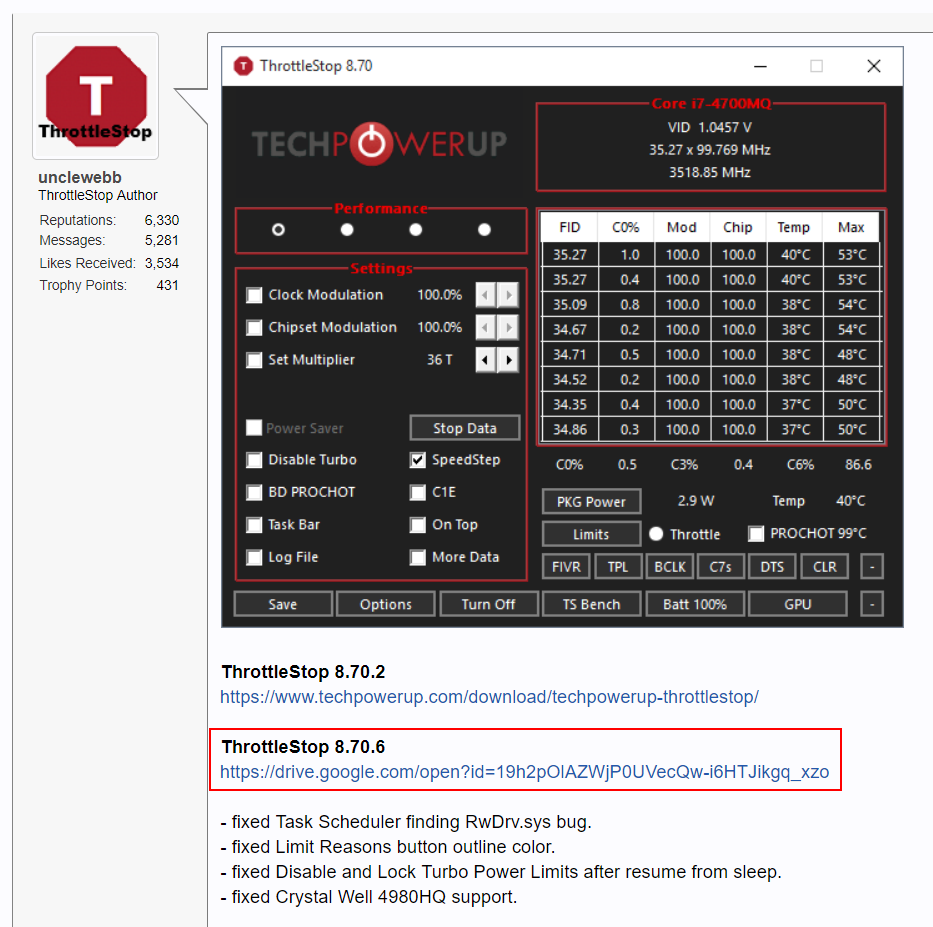
The installation is simple. Extract it and that’s it. I suggest extracting to your “C:\Program Files” since this tool will be a “permanent” tool for your system.

ThrottleStop Settings Setup

When you launch “ThrottleStop.exe” from the extracted contents, at first, you will get a warning about how the software could damage your system. Again, this is true, so double, triple check before you confirm anything.

Once the program is open, from the defaults, I checked:

  • SpeedShift – EPP : To take advantage of Kaby Lake (If you are on Skylake, you should check this too)
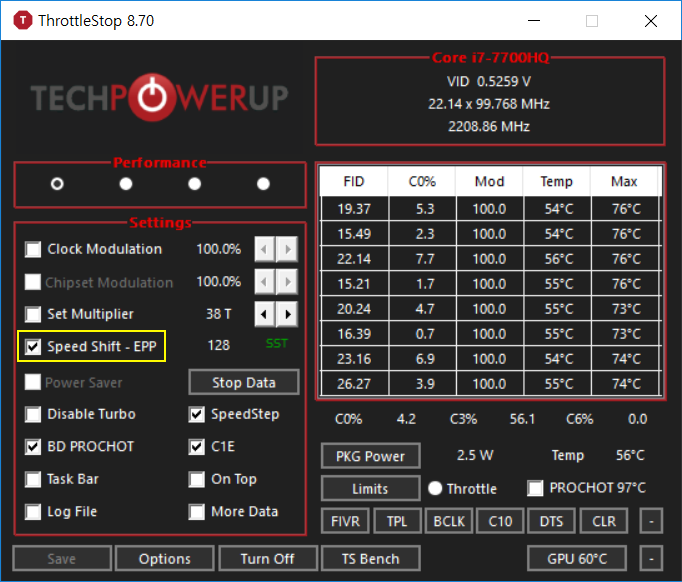
Next, I clicked “Options” to additionally check:

  • CPU Temp : To show the CPU temperature in my notification area
  • Start Minimized : This starts ThrottleStop in a minimized state
  • Minimize on Close : To prevent accidentally closing ThrottleStop
  • Nvidia GPU : To also show my GPU’s temperature on the main ThrottleStop window

With the above checked, your “Options” should look like the following:
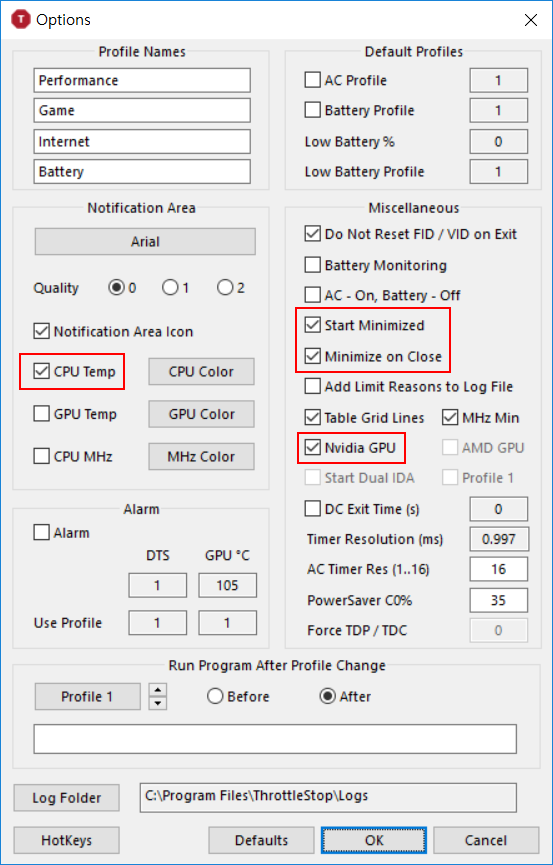
Click “Ok” to save your options.

Note that you can also setup Profiles for different tasks. I will explain setting up different profiles for different situations in a next post to keep this one short.

TPL (Turbo Power Limits) Setup

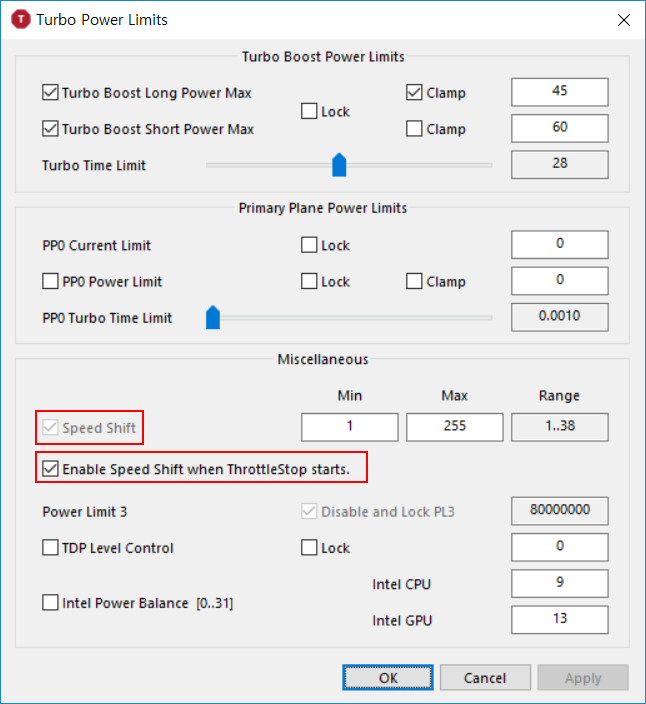
Since we have checked “Speed Shift – EPP” in “Settings,” we also have to enable “Speed Shift” when ThrottleStop launches. Click “TPL” to open your “Turbo Power Limits” window.
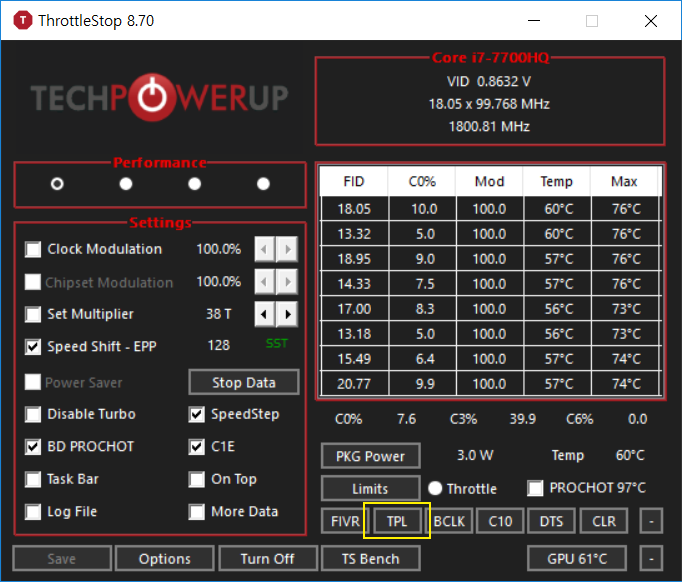
In this window, make sure to check that both “Speed Shift” and “Enable Speed Shift when ThrottleStop starts.” After that, click “Ok.”
FIVR Setup

Now we will undervolt the CPU. Again, this is the riskiest operation, but if you follow my steps, there really should not be any risk!

Click “FIVR” (which is to the left of “TPL”) in the main ThrottleStop window.
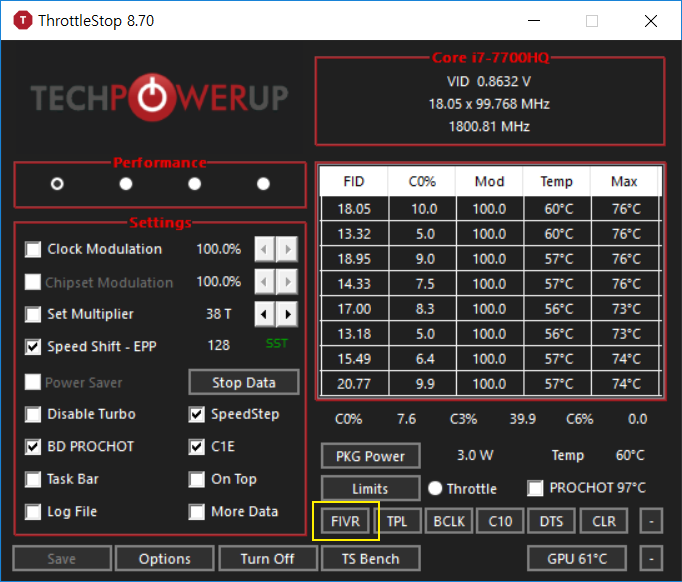
At the center, top area, you will see “FIVR Control,” with 5 radio buttons. From here, we will undervolt “CPU Core,” “CPU Cache,” and “Intel GPU.”

First, select “CPU Core.” Next, right underneath, check “Unlock Adjustable Voltage” inside “CPU Core Voltage.” Make sure the radio button “Adaptive” is selected. Now, modify the “Offset Voltage” to -110 mV. This value seems to be one that works for most Razer Blades. I’m being conservative tho, as I have mine set at -120 mV and have not encountered instability.
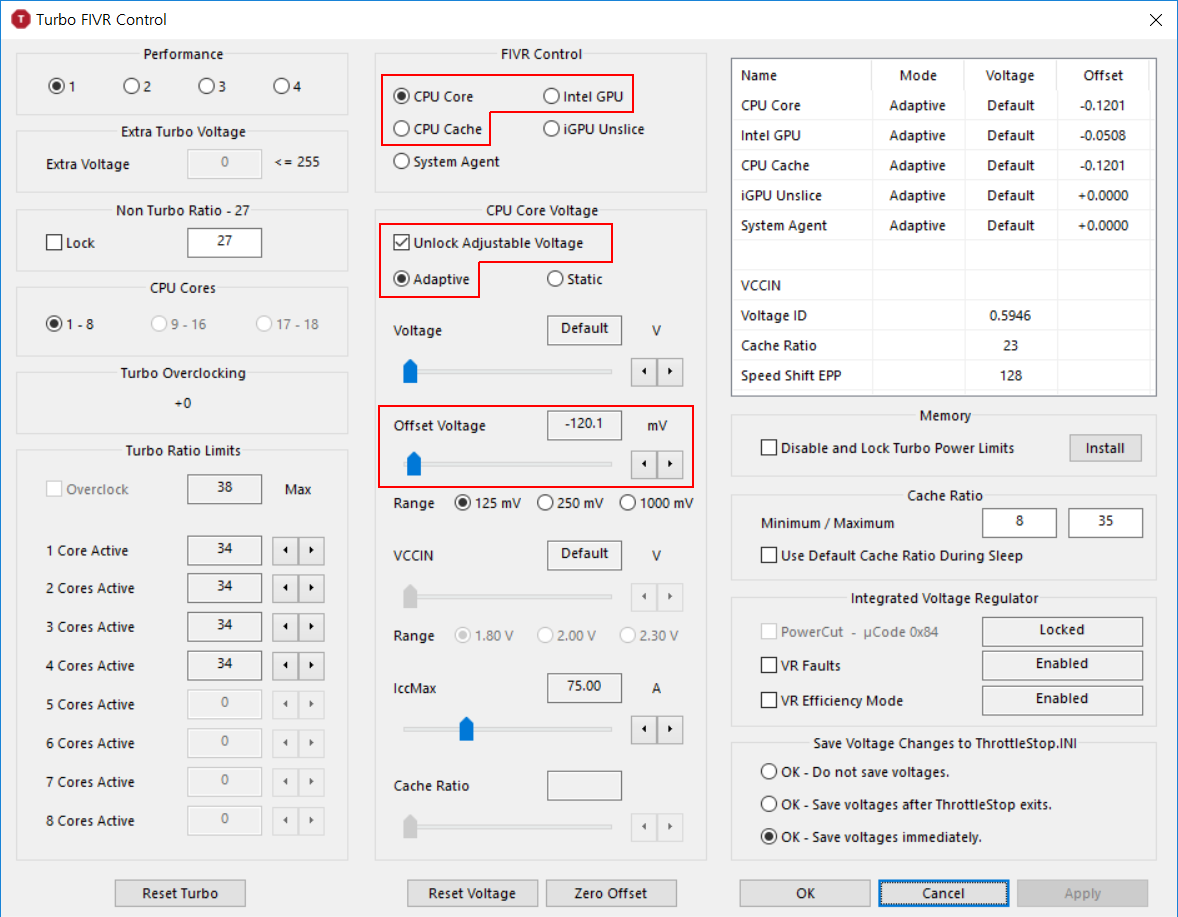
Next, select “CPU Cache” and do the same as above. Check “Unlock Adjustable Voltage” and put it to the same “Offset Voltage” as your “CPU Core.”

Finally, select “Intel GPU.” We will undervolt this less than the previous two because many users have reported that undervolting it too much easily makes the system go unstable. Check “Unlock Adjustable Voltage,” and set the “Offset Voltage” to -50 mV.

Now that is done, first double check to make sure you have made the correct changes. A mistake could melt your laptop.

Once it has been checked, click “Apply” to see the changes take effect at the top right section of the FIVR window.
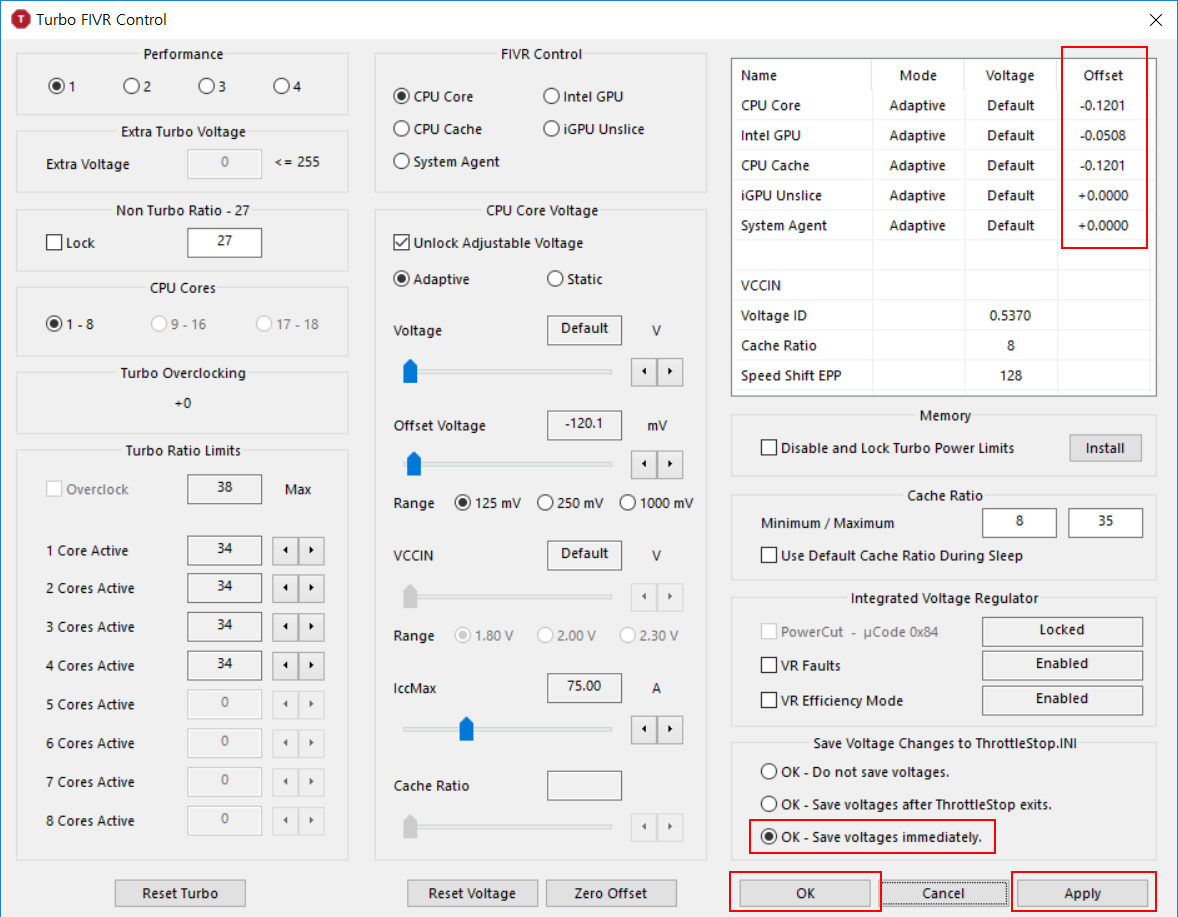
Finally, select the radio button “OK – Save voltages immediately.” to prevent losing your voltage values in the case of a crash, and click “OK” to finish the FIVR setup and go back to ThrottleStop’s main window.

Turn On

With all the changes made, at the bottom of the main window, click “Turn On” to get ThrottleStop to go into effect. (If “Turn Off” is shown, it means that ThrottleStop is already running.)
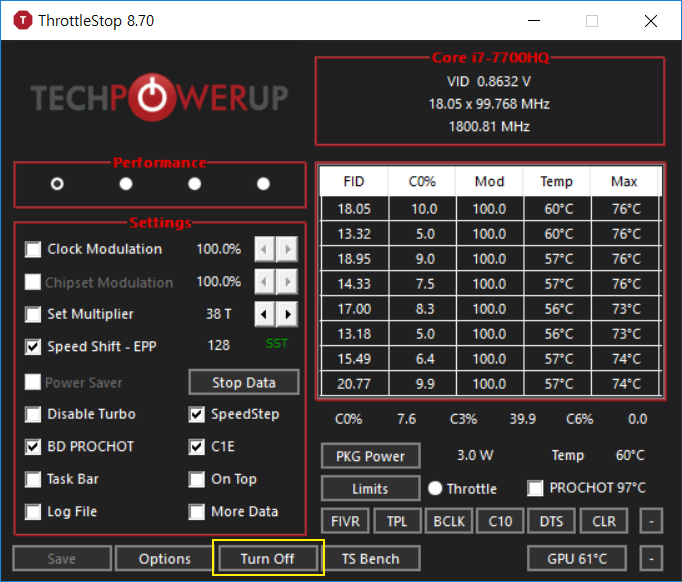
Check for Changes

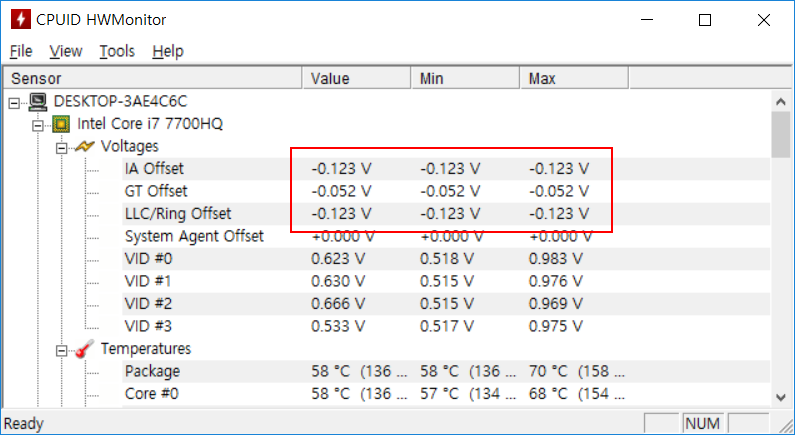
To ensure that undervolting is in effect, we can use a separate software to check it. I downloaded HWMonitor’s portable version (the ZIP version), extracted it, and ran “HWMonitor_x64.exe” to verify the undervolt. As you can see below, it is working!
Stress Test

Now, this is probably the second most important part of this whole experience, as stress testing will tell you if you need to be more conservative or can be more aggressive with your settings.

For CPU intesive tasks, Prime95 is an easy option. To test your GPU, Fire Strike works. In my case, I only tested using Prime95.

Download Prime95 v26.6 and extract it at your preferred destination and run “prime95.exe.”

Running a torture test with the radio button selected at “Blend” with the default settings (in my case 8 torture threads) should be fine.

You should audibly notice your system getting to work. You want to run it for as long as you feel that the system has been sufficiently tested under load. This is where poor ThrottleStop settings can make your system freeze up or display a BSOD before crashing.

If such an event occurs, you need to go back to ThrottleStop and adjust the “Offset Voltage.” A good convention is to adjust by 5 mV. (For example, -120 mv to -115 mV)

Make sure that it is running for at least 5 minutes for the temperature to settle down. I usually leave it running for about 20~30 minutes, but I know that overclockers can have it running for hours.

For fun, after you are done testing, open up ThrottleStop from your notification area, and check your “Max” in the table with the headings, “FID, C0%, Mod, Temp, Max.” Likely, this will be in the 90’s. 97 °C is the throttling point for the i7-7700HQ, and you may have triggered it. However, Prime95 is very intense and during your daily tasks, you should rarely encounter this.

For my setup, I tested by playing “Overwatch” and noticed my temperature hovering around 70 °C all game, from the previous 85 °C. I personally prefer not to go to the 80’s if possible, so these values were quite satisfactory for me.

Auto-Start ThrottleStop

Because ThrottleStop (and Intel XTU) is a software modification (there is a custom BIOS that unlocks overclocking capabilities), it does not run after a complete shutdown. We don’t want to remember to have to run it every time, so we can add it to Windows’ task manager.

This post from the official thread covers this with detailed screenshots. This step isn’t model specific at all, so referring to it works.

Concluding

ThrottleStop has a lot more features and what I’ve shown you in this post is just the bare minimum to extend your Razer Blade’s lifetime. Personally, running intense software that keeps the laptop very warm have caused my battery to swell (according to Razer) and this is my first measure to prevent that from happening again. I don’t want this post to end as a Razer compalint, but their Customer Support isn’t very supportive either, so you have to take your measures to keep your investment working from other potential defects down the road due to heat.

In a next post, I’ll also write about setting up custom profiles to switch between AC and battery mode to extend your battery life, and also measures to force your system to cool off if it nears its thermal safety margins.

If you have any questions, concerns, or comments, let me know in the comments section below and I’ll try to get back to you soon.

Moved blog to minsung.org

If you know me, I used to do domain trading quite a bit. Since those days, I have held on to powerbrowsing.com, a domain from 1998, that I have used as my blog domain.

While it was suitable back in the day when I used to do a lot of web development, I felt that since I do less of that and use this blog more as a repository of random tutorials and thoughts, it may be more appropriate to use another domain (… out of the many! Selling actively!) I have, that is my firstname.org.

The migration has been quite seemless from a back-end point of view, but let’s see how search engines react. 🙂

How to install python-pcl pcl_visualization on Ubuntu

pcl_visualization is a handy visualization feature if you are mostly working with PCL’s PointT format. Unfortunately, for some reason, the visualizer cannot be installed with the provided setup.py file. Hence, you need to make some modifications to it to make it work with certain versions of VTK if you plan on using the visualizer on Ubuntu.

My setup is Ubuntu 16.04. Note that you may have to make some adjustments to the command lines if you are running a different version.

The idea is uncomment certain parts of the “setup.py” file and modify a line such that pcl_visualization runs using the VTK version you have installed on your machine.

In my version of python-pcl, I uncommented line 561:

Included above:

Note that I used “vtk-6.2” instead of “vtk-5.8” because that was the VTK available when I observed the directory contents in /usr/include/.

Lastly, I uncommencted line 625:

For reference purposes, I did not install PCL explicitly, but used the one that came default with ROS Kinetic.

Force Set CPU Frequency on Linux

So I have had to disable the CPU frequency scaling in a recent project. I found that it isn’t as straightforward in Ubuntu 16.04 anymore, because of Intel’s p_state.

Thus, if you want to explicitly set the frequency of the CPU, you now need to disable p_state to go back to ACPI cpufreq.

First, we want to modify grub and update the line:

such that it now reads:

Next, let’s update grub by:

After restarting the computer, you should be able to see that /sys/devices/system/cpu/cpu0/cpufreq/scaling_available_governors now exists again.

Intel Realsense D435 Setup on Ubuntu 16.04

I’ve been writing an Intel Realsense D435 vs ZED mini comparison post, but in a recent project I was doing, I needed to install D435 on a fresh copy of Ubuntu 16.04 and thought that it might be useful to document the process here.

System Preparation

1. Before installing the latest SDK, we need to modify the kernel. Kernel versions 4.4.0-x, 4.8.0-x, 4.10.0-x, 4.13.0-x, or 4.15.0-x are supported as of this post. Check your Ubuntu installation kernel version by running the following command in your terminal:

2. Install some core packages that allow you to build librealsense.

3. I am on Ubuntu 16.04, so you also need to install:

4. Apply the Realsense permissions scripts located in the librealsense source directory. Again, note that this command needs to be run inside your librealsense folder!

5. Finally, let’s download, patch, and build your custom kernel.

If the above is a success, you will get prints that show that your videodev, uvcvideo, hid_sensor_accel_3d, and hid_sensor_gyro_3d has been replaced and this procedure was a success.

Building the SDK

1. I’m going to assume you have CMake installed and your build toolchain is gcc-5. If you are not sure, run:

2. Now, let’s run CMake! I am including the ‘Examples’ option and the ‘Python Bindings’ option since I’d assume you would want to see an example and many people use Python. Feel free to turn them off by removing them.

3. Once CMake has generated the necessary files, let’s install it. In case you have already run ‘make’ in this folder previously, run the following for convenience:

3.a Obviously, feel free todo parallel compilation if your system allows this by replacing make with make -jX

4. Once the SDK is installed, run one of the examples to make sure that everything is installed well!


Passing arguments to Python callback in rospy

To pass more arguments to your callback function in rospy, it is actually super simple.

Of course, rather than a tuple, something like a single “String” could also be passed directly.

Expanding VMware Player Disk Size for Ubuntu

I run a lot of virtual machines and quite often, my initial disk size starts running out because the lifespan of the VM becomes longer than I originally expected. Hence, I need to expand the disk size, and below is how I go about doing this.

1. With your virtual machine turned off, under your VMware “Virtual Machine Settings”, under “Hard Disk (SCSI)”, click “Expand”

2. With the size expanded, turn on your Ubuntu VM and install “GParted”:

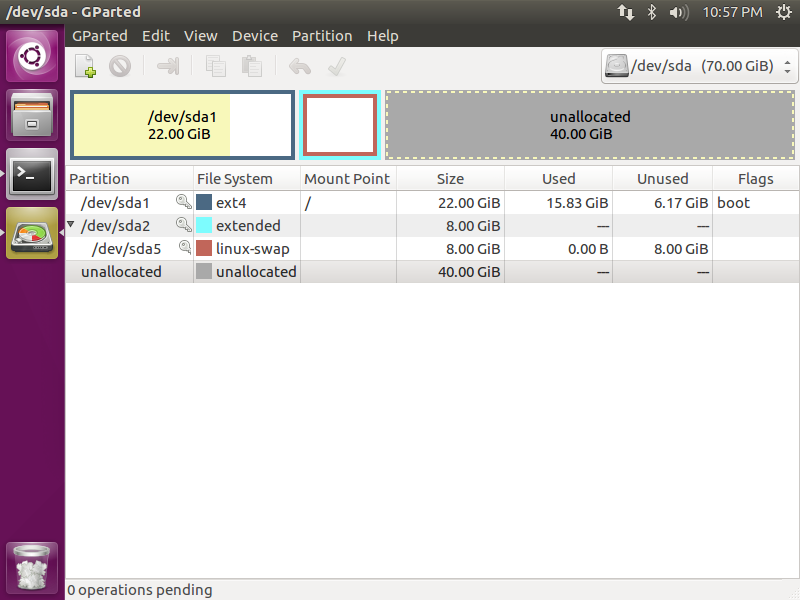
3. Run GParted (it may require sudo) and you should see something like the following:

4. For my case, you can see the unallocated 40 GB of space that I just added, and the swap at /dev/sda5. Right click /dev/sda5 and select Swapoff.

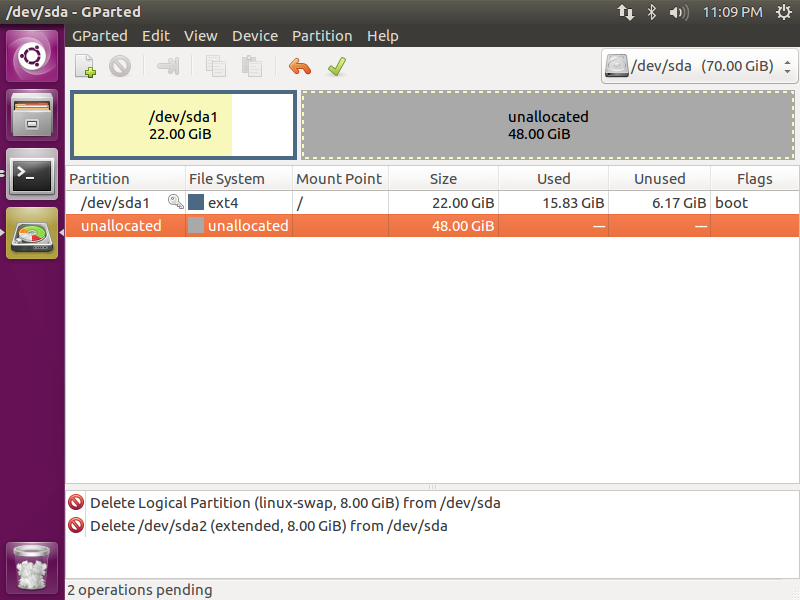
5. Now Delete /dev/sda5 and then also delete /dev/sda2 to only leave /dev/sda1 and the unallocated space.

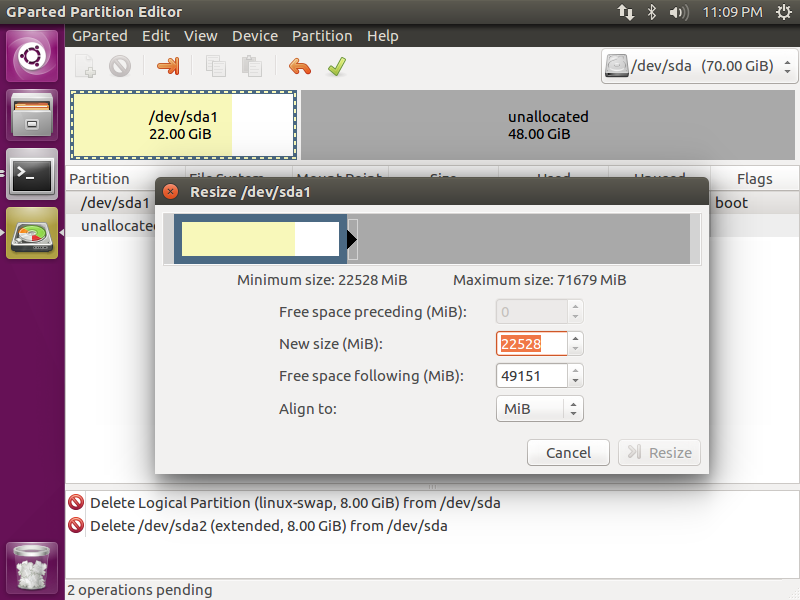
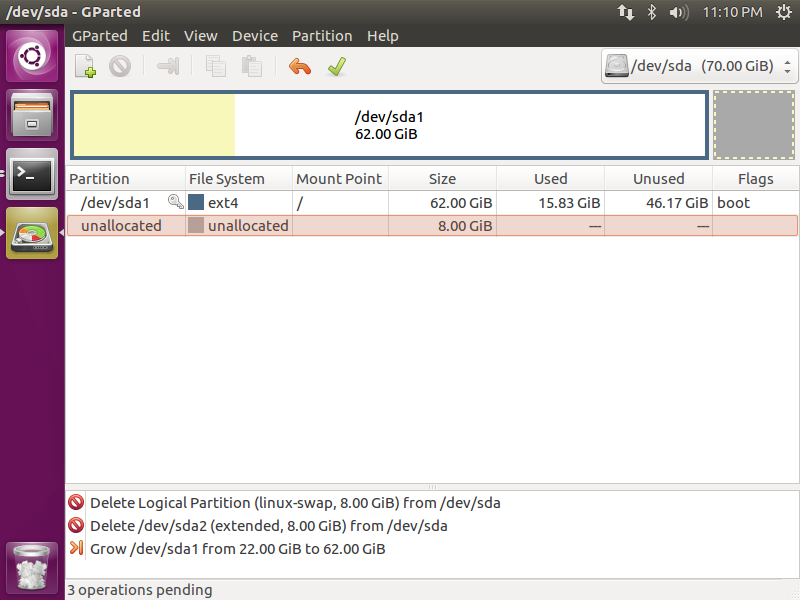
6. Right click /dev/sda1 and Resize. In my case, I left the same amount of space for swap as before (8192 MB).

7. Click the green check mark to apply the changes.

8. With the 8 GB, create a new partition as a “linux-swap” partition and apply the changes.

9. Now, you should see the swap partition at the end of your disk. Right click the swap and set “swapon” to finish.